“Hello world” in the BCPL language on the Xerox Alto simulator

alto-600

Ken Shirriff writes:

The first programming language for the Xerox Alto was BCPL, the language that led to C. This article shows how to write a BCPL “Hello World” program using Bravo, the first WYSIWYG text editor, and run it on the Alto simulator.
The Xerox Alto is the legendary minicomputer from 1973 that helped set the direction for personal computing. Since I’m helping restore a Xerox Alto (details), I wanted to learn more about BCPL programming. (The influential Mesa and and Smalltalk languages were developed on the Alto, but those are a topic for another post.)

Full details at Ken Shirriff’s blog.

More Delta printer upgrades: WiFi and silence!

Delta 3D printer-2015-08-22-21-29-15-600

David Crocker has been working on his Delta 3D printer project:

After performing this upgrade, the printer is much quieter than before. This is because of the change from x16 microstepping on the Duet with A4982 drivers, to interpolated x256 microstepping on the Duet WiFi with TMC2660 drivers. The noisiest component is now the 40mm electronics cooling fan under the bed. I shall search for a quieter 40mm 24V fan, or perhaps do a small redesign of the electronics rear panel to use a slower-running 50mm or 60mm fan instead.
Another benefit of the upgrade is that I can now use the printer in a different room – as I occasionally need to do when hosting meetings – without needing to run a communications cable to it. The gcode file upload speed over WiFi is about 800 kbytes per second, similar to the speed I was previously getting with wired Ethernet on the Duet 0.8.5.

Full details at David Crocker’s Solutions blog.

Check out the video after the break. Continue reading “More Delta printer upgrades: WiFi and silence!”

Make the world’s cheapest MIDI tester

MIDI Tester Cable

Jesse from Bent-Tronics has posted a tutorial on how to make a DIY MIDI tester:

A quick and dirty (and cheap) MIDI tester.  Sometimes you just need to know if a MIDI controller is outputting anything. Even many high-end MIDI modules/boxes will have a “MIDI Activity” light, just to let you know something is being transmitted/received. That’s what I have made in this video.
Using a sacrificial MIDI cable, an LED, and a 220 Ohm resistor, you too can make this tester/activity light, probably in less than 10 minutes.

More details at Bent-Tronics homepage.

Check out the video after the break. Continue reading “Make the world’s cheapest MIDI tester”

App note: Method to reduce the output ripple & noise of power supplies

an_aimtec_psu_reduce_noise

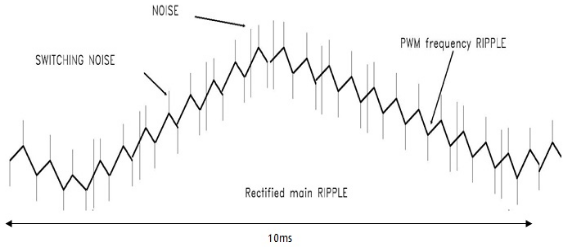
Another app note from Aimtec on power supplies and how to minimize their output noises. Link here

The switching power supplies have the fundamental advantage of high efficiency i.e. low power dissipation when compared to linear voltage regulation. However, there exists an important consideration concerning the presence of ripple and noise at their outputs. If the ripple and noise are left unfiltered their levels may be sufficiently high to adversely affect other devices connected to the same power supply. Fortunately there exists methods to cost effectively reduce the impact of ripple and noise.

Free PCB Sunday: Pick your PCB

IRToy We go through a lot of prototype PCBs, and end up with lots of extras that we’ll never use. Every Sunday we give away a few PCBs from one of our past or future projects, or a related prototype. Our PCBs are made through Seeed Studio’s Fusion board service. This week two random commenters will get a coupon code for the free PCB drawer tomorrow morning. Pick your own PCB. You get unlimited free PCBs now – finish one and we’ll send you another! Don’t forget there’s free PCBs three times every week:

Continue reading “Free PCB Sunday: Pick your PCB”

App note: SAM D/R/L/C Watchdog (WDT) driver

apps

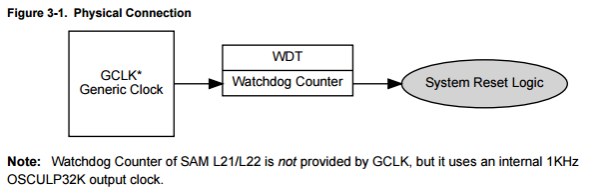
Atmel application note (PDF!) for using the Watchdog in a callback configuration:

This driver for Atmel | SMART ARM-based microcontrollers provides an interface for the configuration and management of the device’s Watchdog Timer module, including the enabling, disabling, and kicking within the device. The following driver API modes are covered by this manual:

  • Polled APIs
  • Callback APIs

LDMOS amplifiers

pho20160622_172847-600

Pete (N6QW) writes:

This project encompasses proving an Arduino Control of a hi Power Linear Amplifier. It is a new departure for N6QW as it has extensive I/O requirements which required moving to the Mega 2560 a Arduino variant that has 56 Digital I/O and 16 Analog Inputs. The on board memory is 256K
The current configuration uses a 3×4 Keypad as the main control element.
Key 1 = Power On
Key 2 = Power Off
Key 3 = Amp Bypass [In this mode the LPF’s are disconnected and the amp power is off it requires RESTART and LPF Selection the TR Relay is disconnected so No RF into the amp on Bypass.LED16 Controls whether the amp is bypassed BUT LED 17 and LED 18 control the actual sequencing of the connection of the amp to the antenna system and the transceiver. WE are trying to avoid “hot switching”. Thus the amp is connected to the antenna first and then the transceiver is connected to the amp. This is done by a small delay on the connection of the amp to the input side. Problem solved!]

More info at N6QW Homebrew Radio blog.

Adding a DHT22 temperature and humidity sensor to the Sonoff

DHT22 temperature

Mikey writes:

Just a few days ago I replaced the firmware on my Sonoff, and immediately after, I wanted more…
After looking on their website, I found a version which also had a DHT11 sensor attached, and I then wanted to do something similar, just with a DHT22 for higher resolution (0.1C on a DHT22, compared to 1C on a DHT11). After digging a bit more in the schematic for the Sonoff, I found that the last pin on the 1×5 pinheader, was connected to GPIO14, so it should not be that difficult to get up and running.

More details at captain-slow.dk

WiFiRGB – A WiFi-enabled RGB high-power LED

IMG_2915-600

Tom blogged about his WiFi/Browser controlled RGB LED project:

Features

  • Simple hardware, using pre-fabricated modules
  • Controls an RGB LED via any recent browser, any operating system
  • WiFi credentials can be configured via browser
  • Software is written as an Arduino sketch

Full details at Tom’s blog.

Check out the video after the break. Continue reading “WiFiRGB – A WiFi-enabled RGB high-power LED”

#FreePCB via Twitter to 2 random RTs

BP-600x373

Every Tuesday we give away two coupons for the free PCB drawer via Twitter. This post was announced on Twitter, and in 24 hours we’ll send coupon codes to two random retweeters. Don’t forget there’s free PCBs three times a every week:

  • Hate Twitter and Facebook? Free PCB Sunday is the classic PCB giveaway. Catch it every Sunday, right here on the blog
  • Tweet-a-PCB Tuesday. Follow us and get boards in 144 characters or less
  • Facebook PCB Friday. Free PCBs will be your friend for the weekend

Some stuff:

  • Yes, we’ll mail it anywhere in the world!
  • Check out how we mail PCBs worldwide video.
  • We’ll contact you via Twitter with a coupon code for the PCB drawer.
  • Limit one PCB per address per month please.
  • Like everything else on this site, PCBs are offered without warranty.

We try to stagger free PCB posts so every time zone has a chance to participate, but the best way to see it first is to subscribe to the RSS feed, follow us on Twitter, or like us on Facebook.

CHINA STUFF: Email that works…

mail-dp

Working from China is a constant reminder that the location of internet services is super important. North America and Europe are just a few internet hops from our servers in Hetzner’s carbon neutral, green energy data center in Germany. From China, however, we’re often routed out through Beijing to San Jose, then to New York, London, Amsterdam, and finally Frankfurt. On a good day we can do that with only 2-3% packet loss.

Back in the good old days Gmail’s imap service worked perfectly even though Google was blocked, but eventually email was blocked too. At that point we added a managed mail server at Hetzner in Germany. Despite having our own non-blocked mail server, Hetzner’s data centers are unreachable during peak periods of the day because of peering agreements, congestion, geolocation, and a million other factors not worth arguing about.

The image above is a WinMTR report, a combination of ping and traceroute that helps locate network problems. 219.* is where we exit on China Unicom’s cable in Beijing and connect at San Jose, California. Nearly 50% packet loss, average ping time of 482ms. This is better than normal because San Jose connected directly to Frankfurt when this test was taken, instead of the more typical New York-> London-> Amsterdam route.

So how bad is it exactly? 5 tries to send a simple text email without attachments. “Failed to save draft, try again?” prompts every few seconds. Ability to see mail subject headers, but not download the message text. Want to send or receive an attachment? Better schedule that for late at night or first thing in the morning.

International bandwidth from China

There are three cable landings in China: Beijing, Shanghai, and Guangzhou. Each is dominated by one of the three state-owned ISPs. China Unicom (our provider) is big in the north with international traffic routing through Beijing and around 1TB/s bandwidth. China Telecom is big in the south (e.g. Shenzhen area) with around 2.5TB/s of bandwidth through Guangzhou. There are also a lot of bit players like Great Wall and TopWay that have city and regional backbones that eventually dump onto the major state-owned ISP infrastructure.

Part of our problem is using a northern ISP (Unicom) in the south. All of our traffic is routed to Beijing before leaving China. While we can see Hong Kong from the office and can walk there in about 15 minutes, connections to Hong Kong websites are routed up to Beijing and back for a 3000km+ journey. This isn’t our choice, Unicom has a monopoly in our Huaqiangbei office and nothing else is available.

This was intended to be an epic post using MTR to analyze the optimal routes and geographical locations to stash internet services with the best chance to be reachable from China. That idea bombed because nearly everything changed dramatically day to day. A test from yesterday is different than a test today, which will probably be different than a test tomorrow. Follow below for tests of several major email providers and their accessibility from China.

Continue reading “CHINA STUFF: Email that works…”

ESP8266 control panel upgrade

IMG_20160620_023521-600

Evan writes, “While writing the article on multiplexing the esp’s inputs I came up with the idea of PWMing all the outputs at once by interrupting the path to ground with an n-FET.  That’s actually not a bad idea, and I have an extra input on the analog MUX that I can use for a light sensor so I can even have auto-dimming.  This is to describe how I did that.”

More info at Evan’s Techie blog.

WA2EBY IRF510 amplifier

DSC_5144-600

Flathagen has published a new build:

The WA2EBY amplifier is a famous linear amplifier project published in QST in March and April 1999 by Mike Kossor WA2EBY. As this amplifier can give up to 50W out with 1W drive, it is a perfect pair for my Softrock RXTX amplifier.
The articles can be found on the ARRL-site (search for WA2EBY) and are highly recommended reading.
I have had a suitable box laying around for quite some time that was perfect for the amplifier project. I decided to go for Manhattan style construction using mainly the parts I already had in my junk-box and not order the PCBs and toroid set which are available from different sources on Ebay. In other words: a low-cost project.

Full details at DIYcrap blog.


Designing a mains frequency monitor

mainsfreqmon_brd3-600

Dan Watson writes:

This is the second in a series of posts about designing a mains frequency monitor using the Microchip PIC 16F1619 microcontroller. In this post we will take a look at the first revision of the board that I designed for the project and some of the features that it adds.
Be sure to read Part 1 of the project write-up if you haven’t done so already.

More details at The Sync Channel blog.

Check out the video after the break. Continue reading “Designing a mains frequency monitor”

App note: Best design and layout practices for SiTime oscillators

an_sitime_an10006

SiTime’s app note about how to properly route an oscillator’s PCB traces. Link here

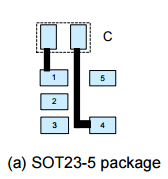
Proper decoupling, bypassing, and power supply noise reduction is important in many applications to ensure optimal performance for oscillators. A common strategy is to place capacitors near high speed devices on a printed circuit board (PCB). These capacitors serve important functions:
– Provide instantaneous current to the component
– Reduce noise propagation through the system
– Shunt the power supply noise to GND
The following sections describe decoupling, bypassing, noise rejection, and power supply condition recommendations for SiTime’s single-ended and differential timing devices.

Free PCB Sunday: Pick your

IRToy We go through a lot of prototype PCBs, and end up with lots of extras that we’ll never use. Every Sunday we give away a few PCBs from one of our past or future projects, or a related prototype. Our PCBs are made through Seeed Studio’s Fusion board service. This week two random commenters will get a coupon code for the free PCB drawer tomorrow morning. Pick your own PCB. You get unlimited free PCBs now – finish one and we’ll send you another! Don’t forget there’s free PCBs three times every week:
Continue reading “Free PCB Sunday: Pick your”

App note: Frequency measurement guidelines for oscillators

an_sitime_an10033

Application note from SiTime about frequency measurements and how some methods may not gauged accurately. Link here

Every digital electronic device requires a reference clock and oscillators are widely used to serve that purpose. Verifying frequency characteristics of high performance devices requires accurate frequency measurement. This document contains an overview of various frequency measurement methods and instruments and is intended to help the users of SiTime MEMS oscillators take accurate frequency measurements.

App note: Selecting inductors for buck converters

apps

An application note (PDF!) from Texas Instruments on inductor selection:

This application report provides design information to help select an off-the-shelf inductor for any continuous-mode buck converter application.
The first part shows how the designer should estimate his requirements, specifically the required inductance.
The next part takes an off-the-shelf inductor and shows how to interpret the specs provided by the vendor in greater detail. A step-by-step procedure is provided.
Finally, all the previous steps are consolidated in a single design table, which answers the question: “How will the selected inductor actually perform in a specific application?”